To list timezones:
timedatectl list-timezones
To set timezone to Europe/Dublin:
sudo timedatectl set-timezone Europe/Dublin
To list timezones:
timedatectl list-timezones
To set timezone to Europe/Dublin:
sudo timedatectl set-timezone Europe/Dublin
//
// Arduino Nano interrupt example
// This program uses the Timer 1 interrupt to implement
// 100 Hz sampling on pin A0. The Timer 1 interrupt service
// routine reads a sample from A0, then prints it out over
// the serial connection to the PC.
//
// Written by Ted Burke 4-Apr-2022
//

// Timer 1 interrupt service routine (ISR)
ISR(TIMER1_COMPA_vect)
{
  Serial.println(analogRead(0)); // Sample voltage on pin A0
}

void setup()
{
  Serial.begin(9600); // Serial connection to print samples

  cli(); // disable interrupts during setup

  // Configure Timer 1 interrupt
  // F_clock = 16e6 Hz, prescaler = 64, Fs = 100 Hz
  TCCR1A = 0;
  TCCR1B = 1<<WGM12 | 0<<CS12 | 1<<CS11 | 1<<CS10;
  TCNT1 = 0;          // reset Timer 1 counter
  // OCR1A = ((F_clock / prescaler) / Fs) - 1 = 2499
  OCR1A = 2499;       // Set sampling frequency Fs = 100 Hz
  TIMSK1 = 1<<OCIE1A; // Enable Timer 1 interrupt

  sei(); // re-enable interrupts
}

void loop()
{
  // Let the ISR do all the work
}
//
// Arduino Nano interrupt example
// Calculates moving average of last N analog samples on pin A0
//
// Written by Ted Burke 6-Apr-2022
//

// Allocate a sample buffer to store N samples
const int N = 4;
int s[N] = {0};
int n = 0; // used as an index variable for the sample buffer

//
// This is the Timer 1 interrupt service routine (ISR).
// This ISR is triggered every 10 ms (i.e. 100 Hz) by Timer 1.
// Each time it is called, it takes a sample from pin A0,
// stores it to the sample buffer (array s[]) and calculates
// the average of all N samples in the buffer.
// For debugging purposes, it prints out the raw samples
// and the moving average, but this would presumably be
// removed in production code, because it's time consuming.
//
ISR(TIMER1_COMPA_vect)
{
  int average;

  // Increment sample number, but reset to 0 when it reaches N
  // Note that "%" is the modulo operator in C
  n = (n + 1) % N;

  // Sample the voltage on pin A0 and store to the nth element of array s
  s[n] = analogRead(0);

  // Calculate average of all N samples in array s
  average = 0;
  for (int m=0 ; m<4 ; ++m) average += s[m];
  average = average / N;

  // Print out the latest sample and the average of the last N samples
  Serial.print(s[n]);      // most recent sample
  Serial.print(" ");       // print space between values
  Serial.println(average); // average of last N samples
}

void setup()
{
  Serial.begin(9600); // Serial connection to print samples

  cli(); // disable interrupts during setup

  // Configure Timer 1 interrupt
  // F_clock = 16e6 Hz, prescaler = 64, Fs = 100 Hz
  TCCR1A = 0;
  TCCR1B = 1<<WGM12 | 0<<CS12 | 1<<CS11 | 1<<CS10;
  TCNT1 = 0;          // reset Timer 1 counter
  // OCR1A = ((F_clock / prescaler) / Fs) - 1 = 2499
  OCR1A = 2499;       // Set sampling frequency Fs = 100 Hz
  TIMSK1 = 1<<OCIE1A; // Enable Timer 1 interrupt

  sei(); // re-enable interrupts
}

void loop()
{
  // Let the ISR do all the work
}
The Arduino IDE requires access to the serial port (/dev/ttyUSB0 on my machine) to upload a sketch to the Arduino. In a Debian Live session, the default user (“user”) doesn’t have permission to access the serial port. Possible solutions include:
Routinely running applications as “root” isn’t good practice, but method 1 also has the downside that all sketch files end up owned by “root”, which is inconvenient.
Method 2 would typically only take effect after logging out and logging back in again. However, the “su” command can be used to launch the Arduino IDE with the new group membership in effect, as shown below:
sudo usermod -a -G dialout $USER
su -m $USER -c Downloads/arduino-1.8.19/arduino
Note that you will be asked to type the password (default password on Debian Live is “live”).


Note: To get VirtualBox working on my machine, I had to disable “secure boot” in the machine’s BIOS settings so that the vboxdrv kernel module could be loaded. The vboxdrv module appears to be unsigned.
Go to this page:
Download this file:
Install the VirtualBox package as follows:
sudo dpkg -i virtualbox-6.1_6.1.38-153438~Debian~bullseye_amd64.deb
sudo apt -f installTo load an existing virtualbox machine image (e.g. “FooBar”), first ensire that the existing machine’s folder structure is all owned by your user. If necessary…
sudo chown -R user FooBar/
sudo chgrp -R user FooBar/sudo apt update
sudo apt install linux-headers-amd64 linux-headers-$(uname -r)
sudo vboxconfigGo to this page:
Download this file:
In the VirtualBox main control panel, go to…
Select the downloaded file, “Oracle_VM_VirtualBox_Extension_Pack-6.1.38.vbox-extpack” to add it to the VirtualBox installation.
Download the Guest Additions iso file from this link:
Start the virtual machine.
From the Devices menu, select “Insert Guest Additions CD image…” and select the Guest Additions iso file.
Open a file explorer window (within the virtual machine) and from the (virtual) CD drive, run the file “VBoxWindowsAddition.exe”.
Reboot the virtual machine.
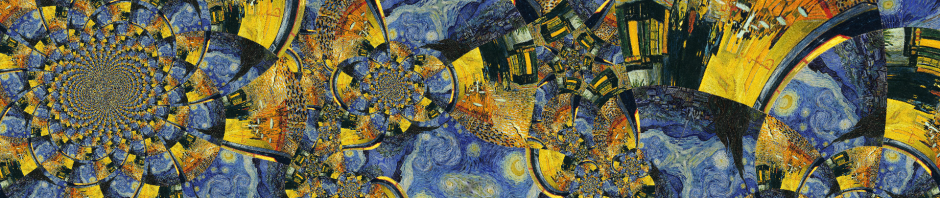
In this plot, four cycles of PRBS-15 are shown. Like all PRBS sequences generated using a linear feedback shift register (LFSR), this binary sequence is periodic with a period of 32767 bits. The colour of each point on the path represents the position of the corresponding bit within the that cycle of the PRBS sequence.

#
# More PRBS turtle graphics - Written by Ted Burke 11-Feb-2022
#

import matplotlib.pyplot as plt
import numpy as np

# Generate 32767-bit PRBS using 15-bit linear feedback shift register (LFSR)
prbs = []
lfsr = np.ones(15, dtype=np.int8)
for i in range(2**15 - 1):
    prbs = prbs + [lfsr[0]]
    b = (lfsr[14] + lfsr[13]) % 2
    lfsr = np.concatenate((np.array([b], dtype=np.int8), lfsr[:-1]))

# Create matplotlib figure
plt.figure(figsize=(4, 4), dpi=600)

# The generated path turns this angle at every step
# One step per bit in the PRBS - left turn for 1, right turn for 0
theta = np.pi/15

# Generate series of complex points for this frame
z = 0 + 0j;
x_min = 0; x_max = 0; y_min=0; y_max = 0;
step = 0 + 1j;
points = np.array([0 + 0j])
for i in range(4):
    for bit in prbs:
        # calculate next complex point and add it to the series for this frame
        step = step * np.exp(1j*(2*bit-1)*theta) # steer left for 1 or right for 0
        z += step
        points = np.append(points, z)
        # Keep track of real and imaginary max and min for plot axes limits
        x_min = min(x_min, np.real(z))
        x_max = max(x_max, np.real(z))
        y_min = min(y_min, np.imag(z))
        y_max = max(y_max, np.imag(z))

# Clear the axes, then plot a line through the complex points in array a
plt.cla()
cx, cy = 0.5*(x_max+x_min), 0.5*(y_max+y_min)
width = max(x_max-x_min, y_max-y_min)
plt.xlim(cx-width/2-100, cx+width/2+100)
plt.ylim(cy-width/2-100, cy+width/2+100)

#plt.plot(points.real, points.imag, linewidth=0.25)
plt.scatter(points.real, points.imag, \
            c=1+np.cos(4*2*np.pi*np.arange(len(points))/len(points)), \
            marker='.', s=0.01)

# Save plot to a PNG file
plt.savefig('turtle.png')
Having just watched two great Numberphile videos with Matt Henderson (1, 2), I was inspired to try visualising a PRBS in the style of turtle graphics. Below is my first quick experiment. The sequence used in this example is the 127-bit maximum length sequence from a 7-bit linear feedback shift register. Every 1 in the sequence makes the line steer left and every 0 makes the line steer right. I’m experimenting with longer PRBS sequences and other rules for steering the line based on the values.
#
# Visualise PRBS, turtle-graphics style - Written by Ted Burke 4-Feb-2022
#
# To convert individual PNG frames to a video animation:
#
#    ffmpeg -y -r 5 -f image2 -i %03d.png -vcodec libx264 -crf 25  -pix_fmt yuv420p test.mp4
#

import matplotlib.pyplot as plt
import numpy as np

# Generate PRBS
prbs = []
lfsr = np.ones(7, dtype=np.int8)
for i in range(2**7 - 1):
    prbs = prbs + [lfsr[0]]
    b = (lfsr[5] + lfsr[6]) % 2
    #lfsr = [b] + lfsr[:-1]
    lfsr = np.concatenate((np.array([b], dtype=np.int8), lfsr[:-1]))

for b in prbs:
    print(b, end=' ', flush=True)

# Create matplotlib figure
plt.figure(figsize=(4, 4), dpi=600)

# Generate 100 animation frames
for frame_index in range(100):
    # Print index for this frame and increment turning angle
    print(frame_index, end=' ', flush=True)
    theta = np.pi/(1.0 + frame_index*9.0/100) # each frame has slightly larger turning angle than the last

    # Generate series of complex points for this frame
    z = 0 + 0j;
    step = 0 + 1j;
    points = np.array([0 + 0j])
    for bit in prbs:
        # calculate next complex point and add it to the series for this frame
        step = step * np.exp(1j*(2*bit-1)*theta) # steer left for 1 or right for 0
        z += step
        points = np.append(points, z)

    # Rotate the entire series of points so that the final point is to the right of origin
    points = np.exp(-1j*np.angle(z)) * points

    # Clear the axes, then plot a line through the complex points in array a
    plt.cla()
    plt.xlim(-100, 100)
    plt.ylim(-100, 100)

    plt.plot(points.real, points.imag)

    # Save current frame to a numbered PNG file
    plt.savefig('{0:03d}.png'.format(frame_index))
I downloaded the BtbN Windows build of ffmpeg from here:
The specific file I downloaded was:
I extracted the zip file, then opened a command window in the “bin” folder where ffmpeg.exe was located and took a photo with camera 0 (the default video capture device) using the following command:
ffmpeg.exe -f vfwcap -i 0 -vframes 1 out.jpgTo do the same without all the text output:
ffmpeg.exe -nostats -loglevel 0 -f vfwcap -i 0 -vframes 1 out.jpgIt should be possible to move ffmpeg.exe to whatever folder you want to take photos in.
To list available DirectShow devices:
ffmpeg -list_devices true -f dshow -i dummyIf a suitable device is listed, use that device name in the following command (instead of “Integrated Webcam”) to snap a photo from the camera:
ffmpeg -f dshow -i video="Integrated Webcam" out.jpgOne of my students is building an Arduino-based robotic system that needs to run a program on the PC to do some image capture. The Python script below bridges the gap. It opens a serial port (you need to specify the COM port that Windows has assigned to the Arduino), then processes incoming characters, waiting for a particular character (‘p’) to be received. When a ‘p’ is received, it launches an application using os.system. In this example, the application launched is Notepad, but it could be whatever you want.
import serial
import os

# Open whatever COM port is assigned to the Arduino
# at the same baudrate that the Arduino is using
with serial.Serial('COM5', 9600, timeout=1) as ser:
    # Now process incoming characters one at a time forever
    while 1:
        c = ser.read()          # read one byte
        print(c)                # print out the byte
        print('\n')             # print new line
        if c == b'p':
            # The received byte was a 'p' character
            # so launch an application on the PC
            os.system("notepad.exe")
            print("Got a P\n")
        else:
            # The received byte (if any) was not a 'p'
            print("Not a P\n")
To test the Python program, I uploaded the following tiny program to the Arduino to send a ‘p’ character once every ten seconds.
void setup()
{
  Serial.begin(9600);
}

void loop()
{
  delay(10000);
  Serial.print("p");
}
NB This post is a work in progress.
Download example files: example_question.zip
This post documents the process I used to programmatically generate multiple variations on a quiz question for the Brightspace virtual learning environment. The quiz question displays an example C program and asks what number it will print out. In each generated variation of the question, placeholder variable names (VAR1, VAR2, VAR3) and numerical values (VAL1, VAL2, VAL3) are replaced by different strings.
The quiz feature in Brightspace provides an “Arithmetic” question type that allows certain values in the question to be randomised and the correct answer to be calculated with a user-specified formula. Unfortunately, the set of supported mathematical operators is very limited. In my code analysis questions, changing the numerical values in the code can alter the flow of control through the program. This forces students to trace the flow of control very carefully, even when attempting the quiz multiple times. Calculating the value printed by each version of the program is more complex than what Brightspace’s Arithmetic question type supports.
My alternative approach for programmatically generating many variations of a question that use the same code structure:
Example template code (“code.c”) for a set of variations on the same code analysis question:
#include <stdio.h>

int main()
{
    int VAR1=VAL1, VAR2=VAL2, VAR3=VAL3;

    VAR3 = VAL1;
    if (VAL2)
    {
        VAR3 = VAL2;
    }

    printf("%d", VAR3);

    return 0;
}
Shown below is an example PNG image produced from one variation on the code template above. “VAR1” has been replaced by “alice”, “VAL1” has been replaced by “-1”, and so on. The modified code has been automatically rendered as a PNG image using ImageMagick. Students are asked to identify the number that the program prints out.

By automating the process of generating variations on a single code template, it’s possible to create code analysis quizzes that remain challenging to students even when attempted multiple times.
On my computer (running Xubuntu Linux 20.04), using ImageMagick to generate a PNG image from each file of example C code required a change to its default security policy. As root, I commented out the following line in /etc/ImageMagick-6/policy.xml
<policy domain="path" rights="none" pattern="@*"/>
The following Python program is used to generate a question list file, with a line of text describing each variation on the question.
#
# generate_list.py - written by Ted Burke - 30-Nov-2021
#
# To generate a list of question variations:
#
#    python3 generate_list.py
#

from random import randrange

names = [('x','y','z'),('a','b','c'),('alice','bob','charlie')]

# This csv file will be imported into the Brightspace quiz
with open('question_list.csv', 'w') as brightspace_import_file:
    # Write a line to define the question base id, question title, question text
    brightspace_import_file.write('COMP2109-FlowOfControl-If1,if statements,What number will this program print?,,\n')
    # Write a line to define the text markers that will be substituted in the example code
    brightspace_import_file.write('VAR1,VAR2,VAR3,VAL1,VAL2,VAL3\n')
    for n in range(20):
        # Randomly select one of the three sets of variable names
        name1,name2,name3 = names[randrange(3)]
        # The following line can be edited to control the numerical range of each value generated in the code
        value1,value2,value3 = str(randrange(20)-10), str(randrange(20)-10), str(randrange(20)-10)
        brightspace_import_file.write(name1 + ',' + name2 + ',' + name3 + ',' + value1 + ',' + value2 + ',' + value3 + '\n')
Shown below is an example of the “question_list.csv” file produced by the above Python program. With the exception of the first two lines, each line defines a different variation on the question. The first three items on each line are the strings to substitute for VAR1, VAR2 and VAR3. The last three items on each line are the strings to substitute for VAL1, VAL2 and VAL3. Different text markers (as many or few as required) can be used by editing line 2.
COMP2109-FlowOfControl-If1,if statements,What number will this program print?,,
VAR1,VAR2,VAR3,VAL1,VAL2,VAL3
alice,bob,charlie,-5,6,0
a,b,c,1,6,6
alice,bob,charlie,-7,1,-3
a,b,c,-4,-6,4
x,y,z,0,3,-10
alice,bob,charlie,3,-9,-7
alice,bob,charlie,-10,-8,0
x,y,z,-6,-5,8
x,y,z,-3,2,2
a,b,c,-2,2,2
alice,bob,charlie,-9,-1,-9
a,b,c,4,-1,8
x,y,z,9,6,8
a,b,c,-10,4,0
x,y,z,-2,4,1
a,b,c,-3,3,-6
alice,bob,charlie,-7,9,-9
alice,bob,charlie,-9,-10,-1
x,y,z,7,-6,4
alice,bob,charlie,8,-4,2
The first line of the above file specifies three items:
Once the file “question_list.csv” is generated, we’re ready to generate the code PNG images and the CSV file containing the information for each question which will be used to import the question variations into Brightspace.
#
# generate_questions.py - written by Ted Burke - 30-Nov-2021
#
# To generate variations on a single question:
#
#    python3 generate_questions.py
#

import os

# This csv file will be imported into the Brightspace quiz
with open('brightspace_import_file.csv', 'w') as brightspace_import_file:

    # Process the question generation list
    with open('question_list.csv', 'r') as list_file:
        # Read all lines from file
        lines = list_file.readlines()

        # First line contains question id, title and text
        question_info = lines[0].strip().split(',')
        question_id_base = question_info[0]
        question_title = question_info[1]
        question_text = question_info[2]

        # Second line contains the text markers to be replaced in the code
        keys = lines[1].strip().split(',')

        # Now generate many variations on the question
        count = 0
        for line in lines:
            # Only begin generating question variations on the third line
            count = count + 1
            if count <= 2:
                continue

            # Generate the unique question ID
            question_id = question_id_base + '-' + str(count-2).zfill(3)
            print('Generating question ' + question_id)

            # Parse values from current line for next variation of the question
            values = line.strip().split(',')

            # Read in the original code from file code.c
            with open('code.c', 'r') as code_file :
                code = code_file.read()

            # Replace the marker strings in the code
            for key,value in zip(keys,values):
                code = code.replace(key, value)

            # Write the updated code to generated_code.c
            with open('generated_code.c', 'w') as file:
                file.write(code)

            # Generate a png image of the code
            os.system('convert -size 1000x1000 xc:white -font "FreeMono" -pointsize 16 -fill black -annotate +15+15 @generated_code.c -trim -bordercolor "#FFF" -border 10 +repage ' + question_id + '.png')

            # Compile and run the generated code to get question answer
            os.system('gcc generated_code.c -o prog')
            os.system('./prog > answer.txt')
            with open('answer.txt', 'r') as answer_file :
                question_answer = answer_file.read()

            # Write the question data to brightspace_import_file.csv
            brightspace_import_file.write('NewQuestion,SA,,,\n')
            brightspace_import_file.write('ID,' + question_id + ',,,\n')
            brightspace_import_file.write('Title,' + question_id + ',,,\n')
            brightspace_import_file.write('QuestionText,' + question_text + ',,,\n')
            brightspace_import_file.write('Points,1,,,\n')
            brightspace_import_file.write('Difficulty,1,,,\n')
            brightspace_import_file.write('Image,images/' + question_id_base + '/' + question_id + '.png,,,\n')
            brightspace_import_file.write('InputBox,1,6,,\n')
            brightspace_import_file.write('Answer,100,' + question_answer + ',,\n')
            brightspace_import_file.write('Hint,,,,\n')
            brightspace_import_file.write('Feedback,,,,\n')
            brightspace_import_file.write(',,,,\n')
Shown below is an example of the Brightspace CSV import file, “brightspace_import_file.csv”. This is generated by the program above.
NewQuestion,SA,,,
ID,COMP2109-FlowOfControl-If1-001,,,
Title,COMP2109-FlowOfControl-If1-001,,,
QuestionText,What number will this program print?,,,
Points,1,,,
Difficulty,1,,,
Image,images/COMP2109-FlowOfControl-If1/COMP2109-FlowOfControl-If1-001.png,,,
InputBox,1,6,,
Answer,100,6,,
Hint,,,,
Feedback,,,,
,,,,
NewQuestion,SA,,,
ID,COMP2109-FlowOfControl-If1-002,,,
Title,COMP2109-FlowOfControl-If1-002,,,
QuestionText,What number will this program print?,,,
Points,1,,,
Difficulty,1,,,
Image,images/COMP2109-FlowOfControl-If1/COMP2109-FlowOfControl-If1-002.png,,,
InputBox,1,6,,
Answer,100,6,,
Hint,,,,
Feedback,,,,
,,,,
NewQuestion,SA,,,
ID,COMP2109-FlowOfControl-If1-003,,,
Title,COMP2109-FlowOfControl-If1-003,,,
QuestionText,What number will this program print?,,,
Points,1,,,
Difficulty,1,,,
Image,images/COMP2109-FlowOfControl-If1/COMP2109-FlowOfControl-If1-003.png,,,
InputBox,1,6,,
Answer,100,1,,
Hint,,,,
Feedback,,,,
,,,,
NewQuestion,SA,,,
ID,COMP2109-FlowOfControl-If1-004,,,
Title,COMP2109-FlowOfControl-If1-004,,,
QuestionText,What number will this program print?,,,
Points,1,,,
Difficulty,1,,,
Image,images/COMP2109-FlowOfControl-If1/COMP2109-FlowOfControl-If1-004.png,,,
InputBox,1,6,,
Answer,100,-6,,
Hint,,,,
Feedback,,,,
,,,,
NewQuestion,SA,,,
ID,COMP2109-FlowOfControl-If1-005,,,
Title,COMP2109-FlowOfControl-If1-005,,,
QuestionText,What number will this program print?,,,
Points,1,,,
Difficulty,1,,,
Image,images/COMP2109-FlowOfControl-If1/COMP2109-FlowOfControl-If1-005.png,,,
InputBox,1,6,,
Answer,100,3,,
Hint,,,,
Feedback,,,,
,,,,
NewQuestion,SA,,,
ID,COMP2109-FlowOfControl-If1-006,,,
Title,COMP2109-FlowOfControl-If1-006,,,
QuestionText,What number will this program print?,,,
Points,1,,,
Difficulty,1,,,
Image,images/COMP2109-FlowOfControl-If1/COMP2109-FlowOfControl-If1-006.png,,,
InputBox,1,6,,
Answer,100,-9,,
Hint,,,,
Feedback,,,,
,,,,
NewQuestion,SA,,,
ID,COMP2109-FlowOfControl-If1-007,,,
Title,COMP2109-FlowOfControl-If1-007,,,
QuestionText,What number will this program print?,,,
Points,1,,,
Difficulty,1,,,
Image,images/COMP2109-FlowOfControl-If1/COMP2109-FlowOfControl-If1-007.png,,,
InputBox,1,6,,
Answer,100,-8,,
Hint,,,,
Feedback,,,,
,,,,
NewQuestion,SA,,,
ID,COMP2109-FlowOfControl-If1-008,,,
Title,COMP2109-FlowOfControl-If1-008,,,
QuestionText,What number will this program print?,,,
Points,1,,,
Difficulty,1,,,
Image,images/COMP2109-FlowOfControl-If1/COMP2109-FlowOfControl-If1-008.png,,,
InputBox,1,6,,
Answer,100,-5,,
Hint,,,,
Feedback,,,,
,,,,
NewQuestion,SA,,,
ID,COMP2109-FlowOfControl-If1-009,,,
Title,COMP2109-FlowOfControl-If1-009,,,
QuestionText,What number will this program print?,,,
Points,1,,,
Difficulty,1,,,
Image,images/COMP2109-FlowOfControl-If1/COMP2109-FlowOfControl-If1-009.png,,,
InputBox,1,6,,
Answer,100,2,,
Hint,,,,
Feedback,,,,
,,,,
NewQuestion,SA,,,
ID,COMP2109-FlowOfControl-If1-010,,,
Title,COMP2109-FlowOfControl-If1-010,,,
QuestionText,What number will this program print?,,,
Points,1,,,
Difficulty,1,,,
Image,images/COMP2109-FlowOfControl-If1/COMP2109-FlowOfControl-If1-010.png,,,
InputBox,1,6,,
Answer,100,2,,
Hint,,,,
Feedback,,,,
,,,,
NewQuestion,SA,,,
ID,COMP2109-FlowOfControl-If1-011,,,
Title,COMP2109-FlowOfControl-If1-011,,,
QuestionText,What number will this program print?,,,
Points,1,,,
Difficulty,1,,,
Image,images/COMP2109-FlowOfControl-If1/COMP2109-FlowOfControl-If1-011.png,,,
InputBox,1,6,,
Answer,100,-1,,
Hint,,,,
Feedback,,,,
,,,,
NewQuestion,SA,,,
ID,COMP2109-FlowOfControl-If1-012,,,
Title,COMP2109-FlowOfControl-If1-012,,,
QuestionText,What number will this program print?,,,
Points,1,,,
Difficulty,1,,,
Image,images/COMP2109-FlowOfControl-If1/COMP2109-FlowOfControl-If1-012.png,,,
InputBox,1,6,,
Answer,100,-1,,
Hint,,,,
Feedback,,,,
,,,,
NewQuestion,SA,,,
ID,COMP2109-FlowOfControl-If1-013,,,
Title,COMP2109-FlowOfControl-If1-013,,,
QuestionText,What number will this program print?,,,
Points,1,,,
Difficulty,1,,,
Image,images/COMP2109-FlowOfControl-If1/COMP2109-FlowOfControl-If1-013.png,,,
InputBox,1,6,,
Answer,100,6,,
Hint,,,,
Feedback,,,,
,,,,
NewQuestion,SA,,,
ID,COMP2109-FlowOfControl-If1-014,,,
Title,COMP2109-FlowOfControl-If1-014,,,
QuestionText,What number will this program print?,,,
Points,1,,,
Difficulty,1,,,
Image,images/COMP2109-FlowOfControl-If1/COMP2109-FlowOfControl-If1-014.png,,,
InputBox,1,6,,
Answer,100,4,,
Hint,,,,
Feedback,,,,
,,,,
NewQuestion,SA,,,
ID,COMP2109-FlowOfControl-If1-015,,,
Title,COMP2109-FlowOfControl-If1-015,,,
QuestionText,What number will this program print?,,,
Points,1,,,
Difficulty,1,,,
Image,images/COMP2109-FlowOfControl-If1/COMP2109-FlowOfControl-If1-015.png,,,
InputBox,1,6,,
Answer,100,4,,
Hint,,,,
Feedback,,,,
,,,,
NewQuestion,SA,,,
ID,COMP2109-FlowOfControl-If1-016,,,
Title,COMP2109-FlowOfControl-If1-016,,,
QuestionText,What number will this program print?,,,
Points,1,,,
Difficulty,1,,,
Image,images/COMP2109-FlowOfControl-If1/COMP2109-FlowOfControl-If1-016.png,,,
InputBox,1,6,,
Answer,100,3,,
Hint,,,,
Feedback,,,,
,,,,
NewQuestion,SA,,,
ID,COMP2109-FlowOfControl-If1-017,,,
Title,COMP2109-FlowOfControl-If1-017,,,
QuestionText,What number will this program print?,,,
Points,1,,,
Difficulty,1,,,
Image,images/COMP2109-FlowOfControl-If1/COMP2109-FlowOfControl-If1-017.png,,,
InputBox,1,6,,
Answer,100,9,,
Hint,,,,
Feedback,,,,
,,,,
NewQuestion,SA,,,
ID,COMP2109-FlowOfControl-If1-018,,,
Title,COMP2109-FlowOfControl-If1-018,,,
QuestionText,What number will this program print?,,,
Points,1,,,
Difficulty,1,,,
Image,images/COMP2109-FlowOfControl-If1/COMP2109-FlowOfControl-If1-018.png,,,
InputBox,1,6,,
Answer,100,-10,,
Hint,,,,
Feedback,,,,
,,,,
NewQuestion,SA,,,
ID,COMP2109-FlowOfControl-If1-019,,,
Title,COMP2109-FlowOfControl-If1-019,,,
QuestionText,What number will this program print?,,,
Points,1,,,
Difficulty,1,,,
Image,images/COMP2109-FlowOfControl-If1/COMP2109-FlowOfControl-If1-019.png,,,
InputBox,1,6,,
Answer,100,-6,,
Hint,,,,
Feedback,,,,
,,,,
NewQuestion,SA,,,
ID,COMP2109-FlowOfControl-If1-020,,,
Title,COMP2109-FlowOfControl-If1-020,,,
QuestionText,What number will this program print?,,,
Points,1,,,
Difficulty,1,,,
Image,images/COMP2109-FlowOfControl-If1/COMP2109-FlowOfControl-If1-020.png,,,
InputBox,1,6,,
Answer,100,-4,,
Hint,,,,
Feedback,,,,
,,,,
First, install gpsbabel and (optionally) gpxviewer.
sudo apt install gpsbabel gpxviewer
Now, use gpsbabel to combine the two .fit files into a single .gpx file.
gpsbabel -i garmin_fit -f B3781326.FIT -f B3792523.FIT -o gpx -F merged.gpx
gpxviewer can be used to check the merged activity on a map.
gpxviewer merged.gpx
The merged activity file can now be uploaded to Strava using the “Upload activity” menu option.
The data in the merged file will be as if the watch was paused at the end of the first recording and restarted at the start of the second activity. Hence, the intervening time will be included in Strava’s elapsed time for the activity, but will be excluded from the moving time. To fully merge the two activities so that there is no discontinuity, the .gpx file can be edited in a text editor. Simply remove the closing </trk> tag of the first activity and the opening <trk> tag of the second activity, which will appear on successive lines, then save and upload to Strava.

| batchloaf on Simple DFT in C | |
| Joseph Makambala on Simple DFT in C | |
| Sanel Lerić on Using a dsPIC30F4011 to genera… | |
| Jim on How to display USB webcam as l… | |
| Mark on Simple communication with a TC… |
